Using create react app, is a lot like living with your parents.
In the way, you don't have the freedom to do what you want/wish unless you eject.

From the link, when one ejects , there's no 'safe' route back unless you start over!, you can however re-use your components as ejecting doesn't affect src folder, just the webpack configurations.
### The problem with create-react-app and the intended setup:
Everytime js or css files are bundled their content's hash is included in the file name, while this is the desired behavior, it's not what you would expect when you intend to integrate/include your react app in other framework/CMS where asset files are distinctively named before they are required/attached to a page(section) via another app 'service'.
With create react app ( or any other bundler of it's kind in such a setup) everytime the file contents change, the name of the file also changes.
Also other tools that build on top of react like Next.js (Nuxt.js for Vuejs), only loads a component file on the page that it's required to avoid the overhead of downloading/including the whole app (js code ) on everypage.
In summary here's what we seek to achieve;
- Distinctively name our output files so we can safely add them in the libraries.yml for Drupal to discover and do it's magic before attaching them on the parts they are required.
- Break the react app, into multiple files(react apps) and require/attach each on the pages they're needed. This will avoid downloading code for another react app that doesn't belong to the page being viewed.
The fix:
There's more than one way to achieve this, an easier one I tried was to abstract webpack output process, where we install another npm library (react-app-rewired) that renames the output file(s) right after webpack is done with it, and before it's put in the output directory.
We will however take another approach, by implementing the webpack setup from scratch.
We will be continuing from a previous blog, so we can keep this one even shorter and straight up to getting react ft dependencies in the Drupal system, where we went through the basic setup for webpack with scss, babel and several input and output files, browser support and more.
We will be adding one more dev dependency @babel/react and updating the babel.config.js to use this and also react and react-dom as the project requires that.
Prerequisites:
- Nodejs , with 🧶 yarn OR npm installed.
- Basic Drupal and React understanding.
- Some idea on why and how to webpack 🕸️🕷️.
- A working instance of Drupal installation.
But first, before we get to the part (part 2) where we include the webpack + setup, let's start with a simple Drupal module with just, a basic block, a basic controller and some libraries definitions (*libraries.yml).
## Part 1 (Module scaffold):
### Module file structure:

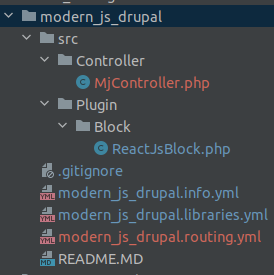
The info.yml is a requirement, the *.libraries.yml defines our libraries for use by the custom block and controller (more about them later), the *.routing.yml and `src/Controller/MjController.php` defines a route as well us the routes response(output/render array), while the`src/Plugin/Block/ReactJsBlock.php` defines a basic block that we can attach on any page (with the markup and the library to attach to each instance)
Below is the code that goes into each file.
// start of *.info.yml
name: Modern Js Drupal
type: module
description: 'Module examples on how to use React js in Drupal with WebPack'
core_version_requirement: ^8 || ^9 || ^10
// end of info.yml


// start of *.libraries.yml
react_block:
  version: VERSION
  js:
    dist/block.bundle.js: {}
  css:
    component:
      dist/block.css: { }

react_controller:
  version: VERSION
  js:
    dist/controller.bundle.js: {}
  css:
    component:
      dist/controller.css: { }

// end of *.libraries.yml

// start of *.routing.yml
modern_js_drupal.controller_view:
  path: '/modern-js-drupal'
  defaults:
    _controller: '\Drupal\modern_js_drupal\Controller\MjController::show'
    _title: 'React on Page'
  requirements:
    _permission: 'access content'
// end of *.routing.yml


// start of controller file
<?php

namespace Drupal\modern_js_drupal\Controller;

use Drupal\Core\Controller\ControllerBase;

/**
 * Provides a route response for the modern_js_drupal module.
 */
class MjController extends ControllerBase {

  /**
   * Returns the /modern-js-drupal page.
   *
   * @return array
   *   A simple render array.
   */
  public function show() {
    $markup = '<div> <h1>React on a Controller!</h1><div id="react-controller"></div> </div>';
    return [
      '#markup' => $markup,
      '#attached' => [
        'library' => 'modern_js_drupal/react_controller',
      ],
    ];
  }

}

// end of controller file

// start of ReactJsBlock.php

<?php

namespace Drupal\modern_js_drupal\Plugin\Block;

use Drupal\Core\Block\BlockBase;

/**
 * Provides a 'ReactJsBlock' block.
 *
 * @Block(
 *   id = "react_js_block",
 *   admin_label = @Translation("React js block"),
 *   category = @Translation("Modern Js Drupal"),
 * )
 */
class ReactJsBlock extends BlockBase {

  /**
   * {@inheritdoc}
   */
  public function build() {
    $markup = '<div> <h1>React on a Block</h1><div id="react-block"></div> </div>';
    return [
      '#markup' => $markup,
      '#attached' => [
        'library' => 'modern_js_drupal/react_block',
      ],
    ];
  }

}


// End of ReactJsBlock.php
### Part 2 (Webpack + ReactJs):
The last part, is getting a development setup for React using webpack (there are other options too besides webpack).
As mentioned earlier, we will be continuing from a previous blog repo about Webpack basics (optimized branch), so we keep this blog shorter and only include the important details. We had already set up webpack to work well with loaders like post-css and babel. We will only add @babel/preset-react as a dev dependency, update the babel.config.js presets to include this, update webpack.config.js to resolve both .js and .jsx files extension and of course do some cleanup, including deleting files that were specific to that blog, as well as updating the entry and output values (webpack.config.js) to match what we have in the *.libraries.yml.
STEPS:
Inside the modern_js_drupal folder run the commands:
`git clone git@github.com:flaircore/a_web.git webpacked`
To clone the repo in a folder named webpacked.
Then, `cd webpacked/` followed by `git checkout optimized` to switch to the optimized branch.
Folders and files to delete inside this webpacked folder are; assets/, libs/, charts.html, composer.json, index.html and anything inside the src folder, also .git which is usually hidden.
Run `yarn add @babel/preset-react -D && yarn add react react-dom prop-types` to install the 4 packages (depedencies) we need.
Before we move on to building the react apps, lets add the two entry files in the src folder, namely block.js and controller.js, then update babel.config.js to include @babel/preset-react and webpack.config.js entry and output values to match, we'll also tell webpack to use the same loaders for jsx files as for js by updating the rules and adding a resolve key for webpack to recognize the .jsx files.
### Below is the updated code for babel.config.js and webpack.config.js:
// start of babel.config.js
module.exports = {
    presets: [
      ["@babel/preset-env", {debug: true, useBuiltIns: "usage", corejs: 3}],
      ["@babel/preset-react", { runtime: "automatic" }],
    ]
}

// end of babel.config.js

// start of webpack.config.js
const ImageMinimizerPlugin = require("image-minimizer-webpack-plugin");
const MiniCSSExtractPlugin = require("mini-css-extract-plugin")
const path = require("path")

let mode = "development",
    source_map = "source-map"

if (process.env.NODE_ENV === "production") {
    mode = "production"
    source_map = "nosources-source-map"
}

module.exports = {
    mode: mode,
    /**
     * entries for raw js files (source)
     */
    entry: {
        block: path.resolve(__dirname, 'src/block.js'),
        controller: path.resolve(__dirname, 'src/controller.js'),
    },
    /**
     * output folder,
     * where [name] === entry[name]/entry[i] from above
     */
    output: {
        filename: '[name].bundle.js',
        path: path.resolve(__dirname, '../dist'),
        clean: true,
    },

    /**
     * devtools controls if and how source maps are generated.
     */
    devtool: source_map,

    /**
     * https://webpack.js.org/configuration/plugins/
     */
    plugins: [
        new MiniCSSExtractPlugin()
    ],

    /**
     * https://webpack.js.org/configuration/module/#rule
     */
    module: {
        rules: [
            {
                test: /\.(sc|c)ss$/i,
                use:[
                    MiniCSSExtractPlugin.loader,
                    "css-loader",
                    "postcss-loader",
                    "sass-loader"
                ]
            },
            {
                test: /\.(js|jsx)$/i,
                exclude: /node_modules/,
                use: [
                    "babel-loader"
                ]
            },
            {
                test: /\.(png|jpe?g|gif|svg)$/i,
                type: "asset"
            },
        ]
    },
    optimization: {
        minimizer: [
            "...",
            new ImageMinimizerPlugin({
                minimizer: {
                    implementation: ImageMinimizerPlugin.squooshMinify,
                    options: {
                        // Your options for `squoosh`
                    },
                },
            }),
        ],
    },
  resolve: {
    extensions: ['.js', '.jsx']
  },
}
// end of webpack.config.js
### Recap so far, and adding the react apps:
From here, we can run `yarn watch` to watch for file changes and recompile our apps into the dist folder, or `yarn build` to build a production bundle.
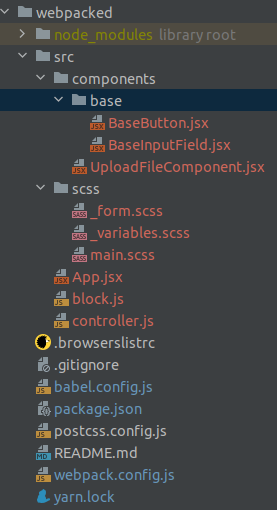
Inside the wepacked/src folder, we'll arrange our files and folder like we would any react app (including base reusable components, and any other as our app requires.
Below is the folder/file structure of the webpacked sub folder.

// start of block.js
import { createRoot } from "react-dom/client";
import { StrictMode } from "react";
import App from "./App";
import "./scss/main.scss"

const root = createRoot(document.getElementById('react-block'))
root.render(
  <StrictMode>
    <App appTitle="Block: Create Product or Service"/>
  </StrictMode>
)

// end of block.js

// start of controller.js

import { createRoot } from "react-dom/client";
import { StrictMode } from "react";
import App from "./App";
import "./scss/main.scss"

const root = createRoot(document.getElementById('react-controller'))
root.render(
  <StrictMode>
    <App appTitle="Controller: Create Product or Service"/>
  </StrictMode>
)

// end of controller.js
// Start of App.jsx
import PropTypes from 'prop-types'

import UploadFileComponent from "./components/UploadFileComponent";
import BaseInputField from "./components/base/BaseInputField";
import {useState} from "react";
import BaseButton from "./components/base/BaseButton";

const App = ({appTitle}) => {
    const [values, updateValues] = useState({
        productName: '',
        productImage: '',
        planName: '',
        price: ''
    });

    const handleChange = (input) => {
        const {key, value} = input
        updateValues({...values, [key]: value})

    }

    const handleClick = e => {
        e.preventDefault()
    }

    return (
        <>
            <main className="container">
                <section className="section item-create">
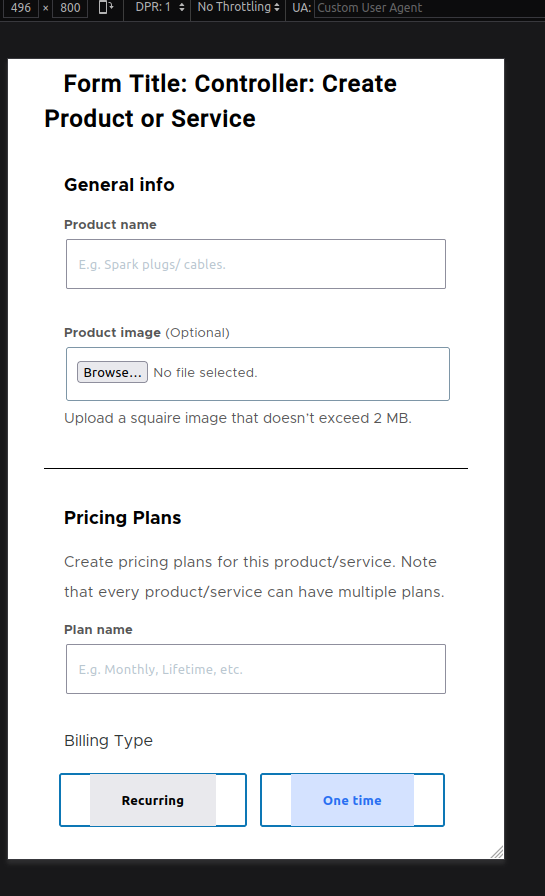
                    <div className="page-title">Form Title: {appTitle} </div>
                    <form className='product-form'>
                        <div className="general-info">
                            <div className="section-title">General info</div>
                            <div className="user-inputs">
                                <BaseInputField
                                    value={values.productName}
                                    name='productName'
                                    required={true}
                                    placeholder='E.g. Spark plugs/ cables.'
                                    label='Product name'
                                    onChange={handleChange}
                                />
                                <UploadFileComponent
                                    value={values.productImage}
                                    name='productImage'
                                    type="file"
                                    placeholder='Upload the product image that doesn’t exceed 2 MB.'
                                    label='Product image'
                                    handleChange={handleChange}
                                />
                            </div>
                        </div>

                        <div className="pricing">
                            <div className="section-title">
                                Pricing Plans
                            </div>
                            <span className="title-description">
                                Create pricing plans for this product/service.
                            Note that every product/service can have multiple plans.
                        </span>

                            <div className="user-inputs">
                                <BaseInputField
                                    value={values.planName}
                                    name='planName'
                                    required={true}
                                    placeholder='E.g. Monthly, Lifetime, etc.'
                                    label='Plan name'
                                    onChange={handleChange}
                                />

                                <div className="group">
                                    <div>Billing Type</div>
                                    <div className="billing-type">
                                        <BaseButton
                                            name='Recurring'
                                            label='Recurring'
                                            onClick={handleClick}
                                        />
                                        <BaseButton
                                            name='One time'
                                            label='One time'
                                            classes="selected"
                                            onClick={handleClick}
                                        />
                                    </div>

                                </div>

                                <BaseInputField
                                    value={values.price}
                                    name='price'
                                    type='text'
                                    required={true}
                                    label='Price'
                                    placeholder="0.00"
                                    onChange={handleChange}
                                />

                            </div>
                            <div className="another-group">
                                <BaseButton
                                    name='another plan'
                                    label='+ Add Another Plan'
                                    onClick={handleClick}
                                />
                            </div>

                        </div>

                        <div className="form-actions">
                            <BaseButton
                                name='Cancel'
                                label='Cancel'
                                onClick={handleClick}
                            />
                            <BaseButton
                                name='Create'
                                label='Create'
                                classes="disabled"
                                onClick={handleClick}
                            />
                        </div>
                    </form>
                </section>
            </main>

        </>
    );
};

App.propTypes = {
  appTitle: PropTypes.string.isRequired
}

export default App;


// End of App.jsx


// start of components/base/BaseButton.jsx
import PropTypes from "prop-types";

import BaseInputField from "./BaseInputField";

const BaseButton = ({name, label, onClick, classes}) => {
    return (
        <div className="button">
            <input
                type="submit"
                value={label}
                className={classes}
                name={name}
                onClick={onClick}
            />
        </div>
    );
};

BaseInputField.propTypes = {
    name: PropTypes.string,
    label: PropTypes.string,
    classes: PropTypes.string,
    onChange: PropTypes.func.isRequired,
}

BaseInputField.defaultProps = {
    name: '',
    label: '',
    classes: '',
}

export default BaseButton;

// end of components/base/BaseButton.jsx
// start of components/base/BaseInput.jsx

import PropTypes from 'prop-types'

const BaseInputField = ({type, name, value, label, placeholder, onChange, required}) => {

    const updateChanges = (event) => {
        const {value, name: key } = event.target
        // @TODO validate and show/set errors related to this scope(input).
        // Send input name (object key in parent) and it's value.
        onChange({key, value})

    }
    return (
        <div className="form-group">
            {label && <label htmlFor={name}>{label} {!required && <span className="optional">(Optional)</span>}</label>}
            <input
                type={type}
                value={value}
                name={name}
                required={required}
                className="form-control"
                placeholder={placeholder}
                onChange={updateChanges}
            />
        </div>
    );
};

BaseInputField.propTypes = {
    type: PropTypes.string,
    value: PropTypes.string,
    name: PropTypes.string,
    label: PropTypes.string,
    required: PropTypes.bool,
    placeholder: PropTypes.string,
    onChange: PropTypes.func.isRequired,
}

BaseInputField.defaultProps = {
    type: 'text',
    value: '',
    name: '',
    label: '',
    required: false,
    placeholder: '',
}

export default BaseInputField;

// End of components/base/BaseInput.jsx

// start of components/UploadFileComponent.jsx
import PropTypes from "prop-types";
import BaseInputField from "./base/BaseInputField";

const UploadFileComponent = ({name, value, label, placeholder, handleChange, required}) => {
    return (
        <div className="form-group">
            {label && <label htmlFor={name}>{label} {!required && <span className="optional">(Optional)</span>}</label>}
            <input
                type="file"
                value={value}
                name={name}
                required={required}
                className="form-control"
                placeholder={placeholder}
                onChange={handleChange}
            />
            <span className="description">Upload an image that doesn’t exceed 2 MB.</span>

        </div>
    );
};


BaseInputField.propTypes = {
  name: PropTypes.string,
  value: PropTypes.string,
  label: PropTypes.string,
  placeholder: PropTypes.string,
  required: PropTypes.bool,
  handleChange: PropTypes.func.isRequired,
}

BaseInputField.defaultProps = {
  name: '',
  value: '',
  label: '',
  placeholder: '',
  required: false,
}


export default UploadFileComponent;
// end of components/UploadFileComponent.jsx

// start of scss/main.scss
@import "variables";

@import url('https://fonts.googleapis.com/css2?family=Roboto:wght@100;300;400;500&display=swap');
//@import "form";

.page-title {
  font-family: 'Roboto', sans-serif;
  font-style: normal;
  font-weight: 700;
  font-size: 24px;
  line-height: 35px;
  /* identical to box height, or 146% */
  text-align: center;
  letter-spacing: 0.26px;
  color: #000000;
  padding: $general_padding;
  margin-top: 1em;
}

// end of scss/main.scss

// start of scss/_variables.scss
$general_padding: .8em;
// @todo centralize app variables, including font-weight,  font-size,   line-height,

// end of scss/_variables.scss

CONCLUSION:
We've successfully integrated ReactJs with Drupal while still having the best of both/tool specific (eating our cake 🍰 while still having it), we can even pass variables from Drupal to the React apps accordingly.
And while at it, I might have shaded create-react-app, but only because of the nature of the requirements, I have used create-react-app in the past and I would still highly consider using it, but that will depend on the project specifics.
I also omitted the contents of `scss/_form.scss`, it's was an attempt to make the form presentable (on large screens) and the implementations on that file can be improved (mixins/re-usables), find it's contents here.
Other webpack loaders/plugins to consider would be @babel/preset-typescript if you want to use typescript in your project, and style-loader if you want to use styled components in your webpack react project.
RESOURCES: